

![You are currently viewing Long Exposure Astrophotography [Get A Drive Motor]](https://i0.wp.com/kevinrfrancis.com/wp-content/uploads/2019/10/M42_Orion_1600_2_26_19_ST_v4.jpg?fit=1280%2C792&ssl=1)
Long exposure astrophotography without a GoTo Mount has been a fun challenge for me. Over the past few months, I’ve posted a few of my results on Reddit to some cheers and many questions. One area I took for granted is that the viewers of my work fully understood how to create these photos. One topic that consistently drove discussion is how I can capture photos for long periouds of time and have zero star trails. Yes a tracking mount is required, but I don’t have a GoTo Mount. So what is my long exposure astrophotography secret…well it’s an motor drive and ok it’s no secret.

The 500 Rule in Long Exposure Astrophotography
The maximum length of an exposure is determined by the 500 Rule. The rule states that 500 divided by the focal length of your lens will give you the maximum time available to expose a photo without creating star trails in the photo. In the cases of my telescopes, these are the longest length of any exposure without a tracking mount:
- Orion ST-80/400 mm Focal Length/1.25 seconds
- Orion Astroview 6/750 mm Focal Length/0.7 seconds
- Meade ETX-125/900 mm Focal Length/0.6 seconds
You can see that there isn’t much time before star trails occur. At best 1.25 seconds is the best I can do with the Orion ST-80. On the other hand, landscape astrophotographers, utilize this successfully to capture photos with the Milky Way in the background. For example the standard 55 mm lens that comes with a DSLR camera can go 5 seconds per exposure. So how do I get longer exposures with my telescopes like the one shown above? Let’s begin with understanding the mount itself.
The German Equatorial Mount
Long exposure astrophotography began in 1880 when Henry Draper took a 51 minute exposure of the Great Orion Nebula. He used a tracking mount to take this photo. The German Equatorial Mount is a popular choice and it was first used in 1824. The creation of Joseph von Fraunhofer for the Great Dorpat Refractor. The equatorial mount simply aligns the telescope to the rotational axis of the Earth. It also uses counter weight to balance the assembly including the telescope to reduce backlash in the gears.
My telescopes sit on an Orion Astroview Equatorial Mount. As shown below, it’s a standard German Equatorial Mount and does not track the night sky. Therefore in order to create long exposures of night sky objects, tracking has to be added using an motor drive.

Also known as a “clock drive”, the motor, rotates the RA axis one revolution every 23 hours and 56 minutes. This is the rate of the apparent motion of the sky. Closely following this apparent motion allows the telescope to stay fixed on an object for long durations.
In addition, the more accurate your alignment to the rotational axis of the Earth, the longer the exposure that can be achieved. In the astrophotography circles, this is called polar alighment and I go into details on my process here.
The Motor
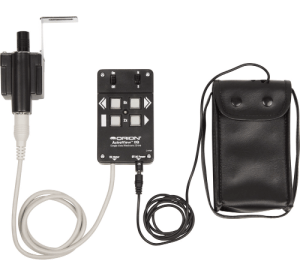
Orion does not sell the mount and drive together, but they make a great pair for me. It comes with a battery pack and you have to attach to the mount yourself. The installation instructions are simple and easy to understand. The only tools needed are allen keys.
I’m not a fan of the battery pack as the batteries will eventually corrode and with regular use, require keeping a large stock available for those moments when the drive stops working in the middle of an exposure. So for less than the cost of a 4 count pack of D size batteries, you can purchase a USB to 6V DC converter. EBay has a few choices that work. I use a portable battery with USB ports, and the motor drive is plugged directly into it.

Long Exposure Astrophotography
I’ve shared how important polar alignment is to long exposure astrophotography, yet I continued to recieve comments on Reddit like:
urah_khuntz
Can you please explain to me why this is important? I read all on your link but didn’t totally get it. Everytime I try taking photos of andromeda I have hefty star trails.
or
CMDR_INTERNET
I’m confused. How did you take those exposures without guiding?
With some further discussion, it became clear that a lot of people new to long exposure astrophotography do not have a tracking mount. Either because they didn’t know they needed one or could not fit one into their budget. And typically tracking mounts are GoTo mounts which are increasingly more expensive. For me cost is one of the reasons for purchasing the mount I have in addition to wanting to learn through trial and error.

Conclusion
My initial limitations were in the camera I chose to use (Google Pixel Really Blue). I watched many YouTube videos to know early on that the $100 purchase of a drive motor was necessary. I didn’t see the benefit until I began using a Canon camera and could not achieve better than 10 second exposures. In addition, the Orion Nebula photo above represents my jump from 10 second exposures to 30 seconds. As well as, the Andromeda photo shows my jump to 2 minute exposures. Spending the money on a motor gets you going and learning how to polar align gets you any length long exposure you desire. Let me know your progress in the comments and clear skies.
![Read more about the article Planetary Nebula Are Spectacular [M27 Dumbbell Nebula]](https://i0.wp.com/kevinrfrancis.com/wp-content/uploads/2020/09/M27_Dumbbell_Nebula_8_26_20_RRRT.jpg?fit=300%2C246&ssl=1)
![Read more about the article Eagle Nebula, A Stellar Nursery [M16]](https://i0.wp.com/kevinrfrancis.com/wp-content/uploads/2020/09/M16_Eagle_Nebula_9_6_20-scaled.jpg?fit=300%2C208&ssl=1)
![Read more about the article Dark Sky Astrophotography [Smokey Mountain Getaway]](https://i0.wp.com/kevinrfrancis.com/wp-content/uploads/2018/08/Planets-8-11-2018.jpg?fit=289%2C300&ssl=1)